![技術語り-Tech Blog[JP]](https://blogger.googleusercontent.com/img/a/AVvXsEiYsL2e14T1O3H3pP9BUj4BxNQQDgWUK-pNhtt6X8syLNp1zvyRWOG_UEv_Gcanv4Nix1_-8MCZL02odSwi69Cbmp6WJeoNDX8f7GQSPH25NUW3dtNTkcGdKhA0sRemc7CD46aj4pMhd8WzzKViOuxBpGmZ5DaFru2sTTv9Jie9aXa98EppzJj1P3lUvyY=s175)
2020.8.6の学習ノート
◆サマリ
案件が確定、それに伴う学習にフォーカスすること◆1dayRais

導入本として、こちらをやることにする。
◆内容まとめ
2004年にDHHがOSSで開発したwebフレームワーク- Railsの概要と環境構築
- 新規作成とルーティングとアクセス手順
- コントローラからビューを作成、レイアウトの適用
- DBとSQLの操作
- モデルの役割、モデル経由のDB操作
- 日記アプリの作成、Scaffold
- データの登録、更新、削除
- 検証ルール
◆1.railsについて
webフレームワーク
現状(2020.8.5)の最新バージョンは6.0.3.1
Rubyの最新バージョンは2.7.1
特徴:
- MVCアーキテクチャ
- 同じことを繰り返さない
- 設定より規約
Rubyはスクリプト言語
◆用意するもの
- VSCode(テキストエディタ)
- Ruby(プログラミング言語)
- Database(データの保存、参照)
- RubyGems(Rails本体のプログラム)
RubyGemsの中身
・actionpack
・actionview
・activerecord
・activesupport
・railties
・sprockets-rails
◆Rubyのインストール
WindowsにRubyをインストールするので、RubyInstallerを使用する。

インストーラーの中に、MSYS2というツールがあるのでそれを起動する。

Rubyの動作確認
専用のプロンプト「Start Command Prompt with Ruby」

◆DBのインストール
書籍ではSQLiteだが、実務はMariaDBなので、そちらにする
・WindowsにMariaDBをインストールする手順
・MariaDB解説
・MariaDBをRuby on Railsで扱う
MariaDB10.5.4

mariaDBのpass:1111
インストール後の動作確認

最初にパスワード認証が求められる

◆Ruby on Railsをインストールする
BundlerというRubyGemsの管理ツール
[Start Command Prompt with Ruby]にて下記コマンド
$ gem install bundler
->bundler2.1.4-gem
次にgemコマンドでRailsをインストールする
[Start Command Prompt with Ruby]にて下記コマンド
$ gem install rails
$rails -v

RubyGemsの主要なモノ
・device
・omniauth
・kaminari
◆2コントローラの基本
◆アプリケーションの作成Railsアプリの開発手順
- ブラウザのリクエストを受け取るコントローラ(アクション)の作成
- ブラウザへの出力を表すビューを作成して、画面表示を切り離す
- 共通のデザインを表すレイアウトを適用する
- データベースを作成したうえで、これにアクセスするためのモデルを定義する
Railsアプリの作成
$ rails new
VSCodeの[表示]から[統合ターミナル]でWindows PowerShellが起動する

Railsフォルダの構成
- app
- bin
- config
- db
- lib
- log
- public
- test
- tmp
- vendor
Railsアプリの起動
$ rails s
Pumaというアプリケーションサーバーが起動する
アプリケーションサーバ...Railsアプリを動かすためのサーバ、webからのリクエスト/レスポンスを処理するWebサーバとしての役割を兼ねている
起動エラー
sqlite3がないといわれた。マストでインストールして、
切り替えがMariaDBなのだろうか。
SQLite3についてSQLite3をインストールする
SQLiteはデータベースサーバを使用せずデータベース毎に1つのファイルを使って管理します。データベースサーバは使用しないためサーバとして常時稼動させるアプリケーションはありません。コマンドから利用するためにはコマンドラインプログラムを使い、PHPやRuby on Railsなどから利用するにはDLLを使用します。
- version3.32.3
- Precompiled Binaries for Windows
- sqlite-tools-win32-x86-3320300.zip
アプリケーションファイルの移動
Zipの中身
- sqldiff.exe
- sqlite.exe
- sqlite3_analyzer.exe
をRuby/binに移動させる
C:\Ruby26-x64\bin
◆再度起動➡エラー
can not load such file — sqlite3/sqlite3_native が出たときは
これのソリューションがあった
- ブラウザで http://www.sqlite.org/download.html を開く。
- 「Precompiled Binaries for Windows」セクションから
sqlite-dllで始まる2個のZIPファイルのうちどちらかをダウンロードする(※)。 - ZIPファイルを展開(解凍)すると1個のフォルダが現れるので、その中にある
sqlite3.dllをコピーする。 - Rubyをインストールしたフォルダ(
C:¥Ruby21など)の下にあるbinフォルダにsqlite3.dllを貼り付ける。
githubのissueによると、、、
This still fixes it for me.
gem uninstall sqlite3 --all
ridk exec pacman -S mingw-w64-x86_64-sqlite3
gem inst sqlite3 --platform ruby
あー疲れた。
終了コマンド: Ctrl + C
◆コントローラの作成
生成プロセス
リクエスト➡コントローラ➡モデル➡ビュー
アプリ開発に必要なファイルを自動生成するコマンドとしてジェネレーターがある
rails g [種別] [コントローラー名] [アクション名]
rails g controller users
実行時に、コントローラに対応する
ビューフォルダ、テストコード、ヘルパーメソッド、アセットファイルが生成
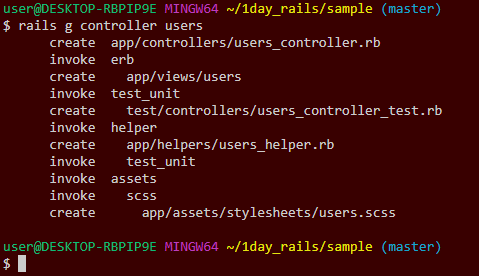
Usersコントローラーにアクションを記述する
app > controllers > users_controller.rb
class UsersController < ApplicationController
def index
render plain: 'Hello World'
end
end

◆ルーティングの設定
➡ユーザからのリクエストをコントローラのアクションに割り振る役割
config/routes.rbに記述
urlをコントローラーのアクションに対応付けているのだね
Rails.application.routes.draw do
# For details on the DSL available within this file, see https://guides.rubyonrails.org/routing.html
get '/users', to:'users#index'
end

◆ビューの基本
◆コントローラーから対応するビューを呼び出すrenderメソッドを書き換える
class UsersController < ApplicationController
def index
render template: 'usxers/index'
end
end
index.html.erb
<div>Hello World</div>
Gemfile::RubyGemのライブラリ管理◆インスタンス変数化
controller
class UsersController < ApplicationController
def index
@hello = 'Hello World'
render template: 'users/index'
end
end
<div><%= @hello %></div>
レイアウト共通app/views/layouts/application.html.erb
<!DOCTYPE html>
<html>
<head>
<title>Sample</title>
<%= csrf_meta_tags %>
<%= csp_meta_tag %>
<%= stylesheet_link_tag 'application', media: 'all', 'data-turbolinks-track': 'reload' %>
<%= javascript_pack_tag 'application', 'data-turbolinks-track': 'reload' %>
</head>
<body>
<%= yield %>
</body>
</html>
<body>
<header>header</header>
<div>
<%= yield %>
</div>
<footer>footer</footer>
</body>
Sprocketsという仕組みによって管理される。
CoffeeScript=>sprockets--->JavaScript
SCSS=>sprockets--->CSS
CSSのマニフェストファイル
tree...以下のものをとりこむ
self...このファイル自体を取り込む
/*
* This is a manifest file that'll be compiled into application.css, which will include all the files
* listed below.
*
* Any CSS and SCSS file within this directory, lib/assets/stylesheets, or any plugin's
* vendor/assets/stylesheets directory can be referenced here using a relative path.
*
* You're free to add application-wide styles to this file and they'll appear at the bottom of the
* compiled file so the styles you add here take precedence over styles defined in any other CSS/SCSS
* files in this directory. Styles in this file should be added after the last require_* statement.
* It is generally better to create a new file per style scope.
*
*= require_tree .
*= require_self
*/
アセット用の定義ファイル
config/initializers/assert.rb
Rails.application.config.assets.precompileのコメントを外して、
個別に読みたいアセットを定義する
asserts.rb
# Be sure to restart your server when you modify this file.
# Version of your assets, change this if you want to expire all your assets.
Rails.application.config.assets.version = '1.0'
# Add additional assets to the asset load path.
# Rails.application.config.assets.paths << Emoji.images_path
# Add Yarn node_modules folder to the asset load path.
Rails.application.config.assets.paths << Rails.root.join('node_modules')
# Precompile additional assets.
# application.js, application.css, and all non-JS/CSS in the app/assets
# folder are already added.
Rails.application.config.assets.precompile += %w( admin.js admin.css )
◆データベースの基本
◆データベースの概念データを整理して格納する場所のこと
データベースの種類
- RDBMS:テーブル
- ODBMS:オブジェクト
- NoSQL:KVS,JSON
◆RDBについて
- データをテーブルという表形式で表したもの
- データを操作する際はSQLを使用する
◆テーブルの構造
- 列:カラム
- 行:レコード
- カラム名
- データ型
◆リレーション
テーブルとテーブルを関連付けすることができるのが特徴
例えば、usersテーブルに会社名を直接持つより、会社IDを持つ方が、会社名が変更になった場合でもusersテーブルには変更を加える必要がない
◆データベース言語SQL
SQLは処理内容によって分類できる
- DDL
- DCL
- DML
◆SQlite3でのテーブル作成
データベースの作成
sqlite3 db/sandbox.sqlite3
テーブルの作成
create table users(id integer, name text);
テーブルの削除
drop table users
◆データ操作文


delete from xxx where xxx
sqlite3 db/sandbox.sqlite3
テーブルの作成
create table users(id integer, name text);
テーブルの削除
drop table users
◆データ操作文
- insert--テーブルにレコードを作成
- select--テーブルに格納されたレコードを参照
- update--テーブルに格納されたレコードを更新
- delete--テーブルに格納されたレコードを削除
insert into () values xxx
select xxx from xxx where xxx

update xxx set xxx = xxx where xxx

delete from xxx where xxx

カラム表示オプション:
.headers on
.mode column
◆モデルの基本
◆データベースへの接続設定モデルとデータベースの関係性:
→テーブルのデータを簡単に操作する機能
→config/database.yml
default: &default
adapter: sqlite3
pool: <%= ENV.fetch("RAILS_MAX_THREADS") { 5 } %>
timeout: 5000
development:
<<: *default
database: db/development.sqlite3
test:
<<: *default
database: db/test.sqlite3
production:
<<: *default
database: db/production.sqlite3
default: &default
adapter: sqlite3
pool: <%= ENV.fetch("RAILS_MAX_THREADS") { 5 } %>
timeout: 5000
development:
<<: *default
database: db/development.sqlite3
test:
<<: *default
database: db/test.sqlite3
production:
<<: *default
database: db/production.sqlite3
・development:開発時
・test:自動テスト実行時
・production:アプリの本番サーバ稼働時
本番稼働時のオプション
rails s -e production
database.ymlの設定値
・adapter:接続のgem
・pool:コネクションの上限
・timeout:応答待ち時間
・database:名称
◆O/Rマッピング
オブジェクト指向言語からRDBにアクセスする際の懸け橋になる仕組み
データ処理のプログラムと、データ保存するRDBの違いを吸収する役目
ActiveRecordはRailsが採用するO/Rマッパーである
テーブルごとに作成されたモデルクラスを通じてデータベースに接続する
メリット
・SQLを書かなくてもデータの検索/登録/更新/削除が可能
・RDBの関連付けをモデルクラスの関連付けとして表現できる
・データの検証機能を提供
全てのモデルクラスはActiveRecordを継承している
◆モデルクラスを作成
$ rails g model
モデルクラスとともに、テーブル作成のSQLを実行するためのマイグレーションファイルも作成される。
◆モデル/マイグレーションの新規作成
rails g model Diary title:string body:text

◆マイグレーションファイルの確認
class CreateDiaries < ActiveRecord::Migration[6.0]
def change
create_table :diaries do |t|
t.string :title
t.text :body
t.timestamps
end
end
end
1
class ApplicationRecord < ActiveRecord::Base
self.abstract_class = true
end
class Diary < ApplicationRecord
end
- マイグレーションファイル(db/migrate/)
- モデルクラス(app/models/)
- モデルクラスのテストコード
- フィクスチャ(テストのひな型)
◆マイグレーションコマンド
$rails db:migrate

➡これにて、データベースにテーブルが新規作成される
◆データベース用コンソールに移動
$rails dbconsole
◆テーブル作成を確認する
.tables
ar_internal_metadata:は参照テーブル、謝っての削除を防ぐため
◆構造の確認
.schema diaries
◆テストデータの準備
新規作成されたテーブルに動作確認用のテストデータを格納する
◆フィクスチャ
テスト用のデータを定義する仕組みをフィクスチャという。
Railsはtest/fixtures/配下に各テーブルごとのYAMLファイルを定義する
rails g model --> diaries.yml
# Read about fixtures at https://api.rubyonrails.org/classes/ActiveRecord/FixtureSet.html
one:
title: MyString
body: MyText
two:
title: MyString
body: MyText
下記のidを付与して修正する
# Read about fixtures at https://api.rubyonrails.org/classes/ActiveRecord/FixtureSet.html
one:
id: 1
title: MyString
body: MyText
two:
id: 2
title: MyString
body: MyText
rails db:fixtures:load
コンソールで生データを確認する
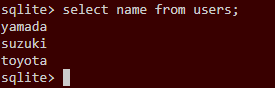
rails dbconsole
select * from diaries
◆モデルクラスにアクセス
モデルクラスからデータベースのデータにアクセスしよう
◆Railsコンソール
rails c で対話的なコンソールを起動する
これでモデルクラスからデータを取り出すことができる
・モデルクラスからレコード参照
Diary.all
-->SELECT "diaries".*FROM "diaries" LIMIT ? [["LIMIT",11]]

-id指定して取り出す:Diary.find(1)
-カラムの値を取得:
- 変数化-->diary = Diary.find(1)
- どっと記法-->diary.id/diary.title/diary.body
・モデルクラスからレコード作成
newメソッドでインスタンスを生成して、値をセットして、saveメソッドをする
1)モデルクラスのインスタンス生成:
diary = Diary.new
2)カラムの値セット:
diary.id = 3
diary.title = "this is title"
diary.body = "this is body"
3)saveメソッドの実行
diary.save
・モデルクラスからレコード更新
newメソッドでインスタンスを生成して、値をセットして、saveメソッドをする
➡作成と手順は同じである
diary.id = 3
diary.title = "it is title"
diary.body = "it is body"
destroyメソッドを呼び出すと削除する
diary.destroy
◆日記アプリの作成
RailsのScaffolding機能でアプリのひな型を作成するrails g scaffold
にて一連の機能が自動生成される
- 一覧画面:/diaries
- 表示画面:/diaries/1
- 登録画面:/diaries/new
- 編集画面:/diaries/1/edit
➡削除画面は作成されない
◆Scaffoldの実行
rails g scaffold diary title:string body:text
自動生成ファイル
- config/routes.rb
- app/controllers/diaries_controller.rb
- app/views/diaries/index.html.erb
- app/views/diaries/edit.html.erb
- app/views/diaries/show.html.erb
- app/views/diaries/new.html.erb
- app/views/diaries/_form.html.erb
- app/assets/stylesheets/scaffolds.scss
ルーティング設定ファイルの確認
Rails.application.routes.draw do
resources :diaries
# For details on the DSL available within this file, see https://guides.rubyonrails.org/routing.html
get '/users', to:'users#index'
end
ルーティングコマンドの確認
rails routes
-->ルーティング情報を表示するコマンド
RESTful::
データを参照/登録/更新/削除するためのwebシステムの設計方針
(.:format)
出力形式の表現:HTML/JSON
◆日記データの一覧表示
localhost:3000/diaries
-->ルーティング情報を表示するコマンド
RESTful::
データを参照/登録/更新/削除するためのwebシステムの設計方針
(.:format)
出力形式の表現:HTML/JSON
◆日記データの一覧表示
localhost:3000/diaries

index.html.erb
---
◆一覧画面の見た目を修正する
<p id="notice"><%= notice %></p>
<h1>Diaries</h1>
<table>
<thead>
<tr>
<th>Title</th>
<th>Body</th>
<th colspan="3"></th>
</tr>
</thead>
<tbody>
<% @diaries.each do |diary| %>
<tr>
<td><%= diary.title %></td>
<td><%= diary.body %></td>
<td><%= link_to 'Show', diary %></td>
<td><%= link_to 'Edit', edit_diary_path(diary) %></td>
<td><%= link_to 'Destroy', diary, method: :delete, data: { confirm: 'Are you sure?' } %></td>
</tr>
<% end %>
</tbody>
</table>
<br>
<%= link_to 'New Diary', new_diary_path %>
<p id="notice"><%= notice %></p>
<h1>日記一覧画面</h1>
<table>
<thead>
<tr>
<th>ID</th>
<th>タイトル</th>
<th>登録日時</th>
<th>登録日時</th>
<th colspan="3"></th>
</tr>
</thead>
<tbody>
<% @diaries.each do |diary| %>
<tr>
<td><%= diary.id %></td>
<td><%= link_to diary.title, diary %></td>
<td><%= diary.created_at %></td>
<td><%= diary.updated_at %></td>
</tr>
<% end %>
</tbody>
</table>
<br>
<%= link_to '日記を新規作成', new_diary_path %>

◆表示日時を修正する
config/application.rb
require_relative 'boot'
require 'rails/all'
# Require the gems listed in Gemfile, including any gems
# you've limited to :test, :development, or :production.
Bundler.require(*Rails.groups)
module Sample
class Application < Rails::Application
# Initialize configuration defaults for originally generated Rails version.
config.load_defaults 6.0
# Settings in config/environments/* take precedence over those specified here.
# Application configuration can go into files in config/initializers
# -- all .rb files in that directory are automatically loaded after loading
# the framework and any gems in your application.
config.time_zone = 'Tokyo'
end
end
Time::DATE_FORMATS[:default] = "%Y年%m月%d日 %H時%M分%S秒"
イニシャライザgemの読み込み直後に起動する箇所
共通設定を書く場所である
Pumaを再起動する
◆日記データの個別表示の設定
showアクションの確認
class DiariesController < ApplicationController
before_action :set_diary, only: [:show, :edit, :update, :destroy]
# GET /diaries
# GET /diaries.json
def index
@diaries = Diary.all
end
# GET /diaries/1
# GET /diaries/1.json
def show
end
# GET /diaries/new
def new
@diary = Diary.new
end
# GET /diaries/1/edit
def edit
end
# POST /diaries
# POST /diaries.json
def create
@diary = Diary.new(diary_params)
respond_to do |format|
if @diary.save
format.html { redirect_to @diary, notice: 'Diary was successfully created.' }
format.json { render :show, status: :created, location: @diary }
else
format.html { render :new }
format.json { render json: @diary.errors, status: :unprocessable_entity }
end
end
end
# PATCH/PUT /diaries/1
# PATCH/PUT /diaries/1.json
def update
respond_to do |format|
if @diary.update(diary_params)
format.html { redirect_to @diary, notice: 'Diary was successfully updated.' }
format.json { render :show, status: :ok, location: @diary }
else
format.html { render :edit }
format.json { render json: @diary.errors, status: :unprocessable_entity }
end
end
end
# DELETE /diaries/1
# DELETE /diaries/1.json
def destroy
@diary.destroy
respond_to do |format|
format.html { redirect_to diaries_url, notice: 'Diary was successfully destroyed.' }
format.json { head :no_content }
end
end
private
# Use callbacks to share common setup or constraints between actions.
def set_diary
@diary = Diary.find(params[:id])
end
# Only allow a list of trusted parameters through.
def diary_params
params.require(:diary).permit(:title, :body)
end
end
<p id="notice"><%= notice %></p>
<p>
<strong>Title:</strong>
<%= @diary.title %>
</p>
<p>
<strong>Body:</strong>
<%= @diary.body %>
</p>
<%= link_to 'Edit', edit_diary_path(@diary) %> |
<%= link_to 'Back', diaries_path %>
<p id="notice"><%= notice %></p>
<p>
<strong>タイトル:</strong>
<%= @diary.title %>
</p>
<p>
<strong>本文:</strong>
<%= @diary.body %>
</p>
<p>
<strong>登録日時:</strong>
<%= @diary.created_at %>
</p>
<p>
<strong>更新日時:</strong>
<%= @diary.updated_at %>
</p>
<%= link_to '編集', edit_diary_path(@diary) %> |
<%= link_to '削除', @diary, method: :delete, data:{ confirm: '本当に削除しますか?'} %> |
<%= link_to '一覧に戻る', diaries_path %>

◆日記アプリの作成(登録)
・日記データの登録
[処理の流れ]
--/diaries/new
--app/views/diaries/new.html.erb
--app/views/diaries/_form.html.erb
[登録フォームに関わるファイル]
・日記データの更新
・日記データの削除
◆案件の詳細
業務工程 : ["要件定義","構築/製造","保守"]
使用ツール : Python
場合によりVue.js
場合によりRuby on Rails
試験自動化Rspec,Capybara,Cucumber
案件詳細 : ①プロジェクト概要
セキュリティサービス向け運用自動化ツールの追加開発
②担当する業務工程
開発
社内での要件定義あり
③担当する業務詳細
社内向けオーダー受付ポータルサイトや
セキュリティサービス向け運用自動化ツールの開発やソフトウェア
また付随する試験実施やドキュメント作成など
マッチング要件 : ↓
コミュニケーションスキル
基礎的なLinuxの知識を有する(触り方を知っている程度)
DBはmariadbかmysqlの使用(深い知識は必要ない)
プロジェクト経験として3~5年別の言語をいじっている人
1~2週間程度の学習期間でスタートできる方
顧客の期待値
・メインのタスクは社内向けオーダー受付ポータルサイトの追加開
既存の開発物をRubyonRailsをメインで開発するとのこ
・試験自動化:Rspec、Capybara、Cucumber
触るとのこと
・要件定義についてメインはリーダーの方が担当され、
こういう案はどうでしょう、
・基本的にリモートワークがメインとなるため
進捗共有やコミュニケーションがうまくとれないような方は厳しい
期待されること:Ruby on Railsや試験自動化のツールなどを自学を通して習得する姿勢
能動的なコミュニケーション、

